Thursday, 25 August 2011

Develop Custom Authentication filters


Types of  authentication filter
  •   Explicit login: This is a login by user name and password as represented by the interfacecom.ibm.portal.auth.ExplicitLoginFilter. For example, this can be a login by using the login portlet or the login URL.
  •   Implicit login: For example, this can be when a user is already authenticated by WAS, but not yet to Portal. This is represented by the interface com.ibm.portal.auth.ImplicitLoginFilter.
  •  Explicit logout: This means that the user triggers a logout action directly, for example by clicking the Logout button in the user interface, interface com.ibm.portal.auth.ExplicitLogoutFilter.
  •  Implicit logout: For example, this can be after a session timeout, or if an authenticated user accesses a public page, or if the user navigates to a virtual portal without being member of the associated user realm. This is represented by the interface com.ibm.portal.auth.ImplicitLogoutFilter.
  •   Session Timeout: This is called immediately after an idle timeout of the user session occurred. This is represented by the interface com.ibm.portal.auth.SessionTimeoutFilter.
  •  Session Validation: This is called for every request before actions are triggered and the page is rendered. This is represented by the interface com.ibm.portal.auth.SessionValidationFilter.

  • Steps to be followed to Create Custom Filter
    To create a custom authentication filter, follow these steps:
    1. Implement one of the six available filter interfaces.
    2. Export your implementation as a JAR onto the Portal class path, for example, portalServer_root/shared/app.
    3. Complete the following steps to register the filter in WebSphere Application Server:
    a.  Login to the WebSphere Application Server Integrated Solutions Console as an Administrator.
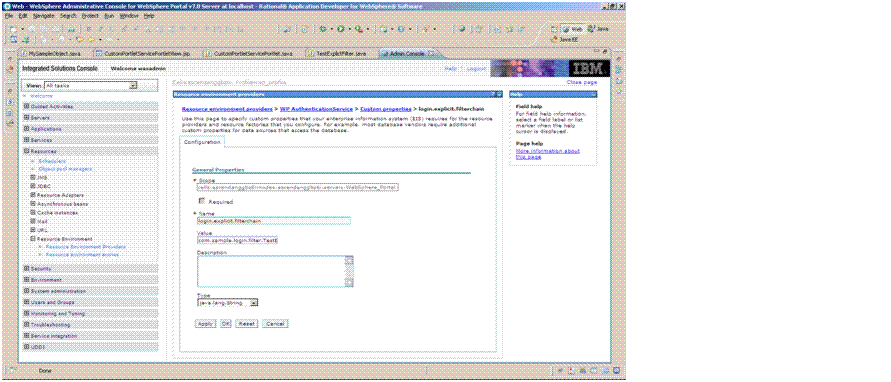
    b. Select Resources->Resource Environment Providers->WPAuthenticationService->Custom properties
    c. Add a new entry to register your custom filter.
    4. Restart WebSphere Portal for the changes to take effect.

    Creating Custom ExplicitLoginFilter
    import javax.servlet.http.HttpServletRequest;
    import javax.servlet.http.HttpServletResponse;
    import com.ibm.websphere.security.WSSecurityException;
    import com.ibm.portal.auth.ExplicitLoginFilter;
    import com.ibm.portal.auth.ExplicitLoginFilterChain;
    import com.ibm.portal.auth.FilterChainContext;
    import com.ibm.portal.auth.exceptions.*;
    import com.ibm.portal.security.SecurityFilterConfig;
    import com.ibm.portal.security.exceptions.SecurityFilterInitException;
    import javax.security.auth.Subject;
    import javax.security.auth.login.LoginException;
    public class TestExplictFilter implements ExplicitLoginFilter{

          public void destroy() {
                // TODO Auto-generated method stub
               
          }

          public void init(SecurityFilterConfig arg0)
                      throws SecurityFilterInitException {
                // TODO Auto-generated method stub
               
          }

        public void login(HttpServletRequest req,
                HttpServletResponse resp,
                String userID,
                char[] password,
                FilterChainContext portalLoginContext,
                Subject subject,
                String realm,
                ExplicitLoginFilterChain chain)
          throws javax.security.auth.login.LoginException,
                WSSecurityException,
                PasswordInvalidException,
                UserIDInvalidException,
                AuthenticationFailedException,
                AuthenticationException,
                SystemLoginException,
                LoginException {
                 // first call the next filter in the chain to pass on the login information
            try {
                     
                chain.login(req, resp, userID, password, portalLoginContext, subject, realm);
                System.out.println("RedirectURL="+portalLoginContext.getRedirectURL());
                System.out.println("Paasword="+password);
                     
                } catch (com.ibm.portal.auth.exceptions.LoginException e) {
                      // TODO Auto-generated catch block
                      e.printStackTrace();
                }
                // TODO Auto-generated method stub
          }

    }

    Registering the service

       
             Name: login.explicit.filterchain
           Value: com.sample.login.filter.TestExplictFilter
 
              After Login using  Login Portlet:


 Download the code

Creating a custom Portlet Service

Step to follow to create  a portlet service:
  • Create a utility project.
  • Create an interface class. Extend the PortletService interface com.ibm.portal.portlet.service.PortletService.
  • Implement the com.ibm.portal.portlet.service.spi.PortletServiceProvider interface to create an implementation class. This is your interface.
  • Export the service Java archive (JAR) file.
  • Register the service.
  • Restart the server
Defining the interface
package com.sample.portlet.service;
import java.io.IOException;
import javax.portlet.PortletRequest;
import javax.portlet.PortletResponse;
import com.ibm.portal.portlet.service.PortletService;
public interface  MyService extends  PortletService{
      /** print a nice greeting */
       public void sayHello(PortletRequest request, PortletResponse response)  throws IOException;
}            
Writing the service implementation
package com.sample.portlet.service;
import java.io.IOException;
import java.util.prefs.Preferences;
import javax.portlet.PortletRequest;
import javax.portlet.PortletResponse;
import com.ibm.portal.portlet.service.spi.PortletServiceProvider;
public class MyServiceImpl implements MyService,PortletServiceProvider  {
      private String message;
    // called by the portal when the service is initialized       
    public void init(Preferences servicePreferences) {
        // read the message from the configuration, default is "Hello"
        message = servicePreferences.get("message", "Hello");
    }
      public void sayHello(PortletRequest request, PortletResponse response)
                  throws IOException {
              String user = request.getRemoteUser();
            System.out.println("Calling SayHello"+message);
      }
}

Registering the service
·         Put all service interface and implementation classes into a JAR file.
·         Place the JAR file in the wp_profile/PortalServer_root/config directory.
·         Register the new portlet service with the WP PortletServiceRegistryService resource environment provider in the WebSphere Application Server administration console.
·         Create an entry to register the implementation in the JNDI directory. The name for this entry is jndi.service_interface and the value is service implementation. The fully qualified service interface name can then be used to lookup the service.
·         Restart WebSphere Portal to activate the new settings.


name :jndi.com.sample.portlet.service.MyService
            Value: com.sample.portlet.service.MyServiceImpl

Portlet Code

import javax.portlet.*;
import com.ibm.portal.portlet.service.PortletServiceHome;
import com.ibm.portal.portlet.service.PortletServiceUnavailableException;
import com.sample.portlet.service.MyService;
/**
 * A sample portlet based on GenericPortlet
 */
public class CustomPortletServicePortlet extends GenericPortlet {

       public static final String JSP_FOLDER    = "/_CustomPortletServicePortlet/jsp/";    // JSP folder name

       public static final String VIEW_JSP      = "CustomPortletServicePortletView";         // JSP file name to be rendered on the view mode
       private PortletServiceHome accountInfoServiceHome;
       private MyService myservice;
     
      /**
       * @see javax.portlet.Portlet#init()
       */
      public void init() throws PortletException{
            /* Lookup the portlet service */
          try {
            javax.naming.Context ctx = new javax.naming.InitialContext();
            Object home = ctx.lookup("portletservice/com.sample.portlet.service.MyService");
              if (home != null)
                  accountInfoServiceHome = (PortletServiceHome) home;
          } catch(NameNotFoundException ex) {
                  System.out.println("MyService is not found");
                  ex.printStackTrace();
          } catch (NamingException ex) {
                  System.out.println("MyService is not available");
                  ex.printStackTrace();
          }
      }

      /**
       * Serve up the <code>view</code> mode.
       *
       * @see javax.portlet.GenericPortlet#doView(javax.portlet.RenderRequest, javax.portlet.RenderResponse)
       */
      public void doView(RenderRequest request, RenderResponse response) throws PortletException, IOException {
            // Set the MIME type for the render response
            response.setContentType(request.getResponseContentType());
            if(accountInfoServiceHome != null){
                  try {
                        myservice = (MyService)accountInfoServiceHome.getPortletService(MyService.class);
                        myservice.sayHello(request, response);
                  } catch (PortletServiceUnavailableException e) {
                        System.out.println("MyService is not available");
                        e.printStackTrace();
                  }
            }
            // Invoke the JSP to render
            PortletRequestDispatcher rd = getPortletContext().getRequestDispatcher(getJspFilePath(request, VIEW_JSP));
            rd.include(request,response);
      }
Result in Console:


Download the code

Friday, 12 August 2011

Developing Restful Web services Using IBM JAX-RS

Java™ API for RESTful Web Services (JAX-RS) is a programming model that provides a mechanism for developing services that follow Representational State Transfer (REST) principles. Using JAX-RS, development of RESTful services is simplified.

The IBM® implementation of JAX-RS provides an implementation of the JAX-RS specification.

IBM JAX-RS includes the following features:
  • JAX-RS server runtime
  • Standalone client API with the option to use Apache HttpClient 4.0 as the underlying client
  • Built-in entity provider support for JSON4J
  • An Atom JAXB model in addition to Apache Abdera support
  • Multipart content support
  • A handler system to integrate user handlers into the processing of requests and responses
Required Jars:
  • jsr311-api.jar
  • commons-lang.jar
  • slf4j-api.jar
  • slf4j-jdk14.jar
  • ibm-wink-jaxrs.jar
Step 1 - Creating the Root Resource
As defined in the JAX-RS specification, by default, resource instances are created per request.  For the JAX-RS runtime environment to create a resource instance, you must have either a constructor with no argument or a constructor with only JAX-RS annotated parameters(@Context,@HeaderParam,@CookieParam,@MatrixParam,@QueryParam,@PathParam). present.
I created a class with no constructor.
public class HelloWorld {

}
Step 2 – Adding path to resource
Add a @javax.ws.rs.Path annotation to HelloWorld class.  For each @javax.ws.rs.Path annotation, set the value as the part of the URL after the base URL of the application.

@Path("/home")
public class HelloWorld {
..
}

Step 3 – Adding method to resource
 I have created a method called welcomeMessage and annotate the method as GET
@Path("/home")
public class HelloWorld {

      @GET
      public String welcomeMessage(){
            return "Welcome to Our Websphere Portal JAX-RS";
      }    
}
Whenever an HTTP GET request is received by this class, the welcomeMessage method will be invoked.


Step 4 – Creating a javax.ws.rs.core.Application sub-class
For non-JAX-RS aware web container environments (most environments are currently non JAX-RS aware), a javax.ws.rs.core.Application sub-class needs to be created which returns sets of JAX-RS root resources and providers. In the following example, there is only one root resource that will need to be returned.
public class RestConfig extends  Application{
      public Set<Class<?>> getClasses() {
            Set<Class<?>> classes = new HashSet<Class<?>>();
            classes.add(HelloWorld.class);
            return classes;
      }
}
Step 5 – Configure the web.xml file for the JAX-RS application
We need to modify the web.xml so that the servlet container knows that the web application is JAX-RS supported and what are the JAX-RS classes by specifying the application configuration sub class as a parameter.
<web-app id="WebApp_ID" version="2.5" xmlns="http://java.sun.com/xml/ns/javaee" xmlns:xsi="http://www.w3.org/2001/XMLSchema-instance" xsi:schemaLocation="http://java.sun.com/xml/ns/javaee http://java.sun.com/xml/ns/javaee/web-app_2_5.xsd">
      <display-name>RestExample</display-name>
      <servlet>
                  <servlet-name>REST</servlet-name>
                  <servlet-class>com.ibm.websphere.jaxrs.server.IBMRestServlet</servlet-class>
                  <init-param>
                        <param-name>javax.ws.rs.Application</param-name>
                        <param-value>com.ourwebsphereportal.jaxrs.RestConfig</param-value>
                  </init-param>
                  <load-on-startup>1</load-on-startup>
            </servlet>
            <servlet-mapping>
                  <servlet-name>REST</servlet-name>
                  <url-pattern>/rest/*</url-pattern>
    </servlet-mapping>
</web-app>


click here to download the example

on accessing,

where RestExample is context root


Monday, 8 August 2011

Custom Flow Handlers in spring webflow

 What Custom flow handlers can do?
  •   Return the id of a flow definition to execute
  •  Creating the input to pass new executions of that flow as they are started
  • Handling outcomes returned by executions of that flow as they end
  •  Handling any exceptions thrown by executions of that flow as they occur
In this example, we are redirecting from hello flow to view flow.